# How to Report a Lost or Stolen Computer/Device
If your desktop, laptop, or mobile device has been lost or stolen report the incident to the local police department and get take note of the report number.
If the stolen or lost device was issued by the University, you should then report the event to UCDH Information Technology (IT) Department by calling 916-734-4357 and also report the incident to UC Davis Health Campus Police by calling 916-734-2555. If the incident occurred on the UC Davis Campus contact the UC Davis Police Department at 530-752-1727.
# Research Subject Tracking System
The Research Subject Tracking System is designed to solve several challenges in research processes. It provides a centralized platform for managing recruitment, contact encounters, consents, incentives, subject information, appointments, biospecimen sample data, and other subject-related data pertinent to public health sciences research.
## Features Overview
### Recruitment and Contact Encounters Module
- Track eligibility and enrollment statuses for potential research subjects.
- Log contact attempts (email, phone, etc.) and notes for each contact encounter.
- Manually add new subjects to the system as needed.
- Organize subjects based on age or number of contact attempts.
- Record preferred languages, "Do not contact", and "Caution needed for staff" statuses.
### Consent Tracking
- Track multiple consent options per subject.
- Document when a subject gave or refused consent, including timestamps and the facilitating staff member.
### Incentives Tracking
- Record study incentives (payments, gift cards) for subjects.
### Subject ID Generation
- Assigns unique subject identification numbers for de-identification purposes.
### Study Module
- Organize subjects into households and families, with defined relationships.
- Save notes for each subject.
### Appointments Module
- Manage study appointments (in-person and remote) with a calendar system.
- Track appointment completion statuses, locations, and notes.
### Custom Questionnaires
- Data entry for custom personal data (similar to RedCap surveys).
## Biospecimen Data Tracking
- Manage biological material samples, including type, collection process status, location, and association with diagnostic tests and results.
- Record the subject from whom the material was collected and the staff member who conducted the collection.
- Generate and track QR codes for each biospecimen or test.
## Metadata and Vitals Tracking
- Record basic metadata about the subject, such as DOB, height, weight, gender, blood pressure, demographics, preferred name.
Each feature is designed to streamline the research processes, improve data management, and ensure compliance with cybersecurity guidelines and best practices.
## Getting started
To get started with the Research Subject Tracking System, please submit a ticket to PHS IT with your study description, scope of the study, and other details.
## Costs
The above features are included with initial onboarding to the system, which will take approximately 5-10 hours of IT time, assuming no modifications are needed to the system to accommodate your study. If customizations or programming changes are required, cost estimations will be provided on a case-by-case basis depending on the needs of the study.
# My laptop camera is not working? How do I get it to work?
The most common cause of laptop camera's not displaying is that the camera is blocked by the camera privacy shutter. The privacy shutter is hard to see, but it’s just above the camera in the middle of the top of the laptop.
This YouTube video shows where the privacy shutter is located: [https://www.youtube.com/watch?v=G9x7P5njCmQ](https://www.youtube.com/watch?v=G9x7P5njCmQ)
If the privacy shutter on your laptop is open and the camera still does not display, contact PHS IT at
# Zoom Phone
Information on Zoom Phone Usage
# Zoom Phone Overview
**What is Zoom Phone?**
Zoom Phone is flexible, versatile, can seamlessly transfer calls across devices and to different mediums, easily switching from voice to video and back again. Using the Zoom desktop or mobile application to make phone calls will allow UC Davis to greatly reduce the need for physical phones for most users on campus.
Users can operate Zoom Phone on their existing devices (computer, tablet, or mobile devices) as a softphone. Zoom Phone is built into the existing Zoom app that UC Davis uses for video conferencing. Once activated, a phone icon will appear on the Zoom toolbar to indicate that Zoom Phone has been activated.
If you have not yet accessed the campus Zoom instance, you will need to sign in prior to receiving Zoom Phone. You can access Zoom at https://ucdavis.zoom.us using your UC Davis logon ID and password.
**Who Can Use Zoom Phone?**
PHS employees that meet the following criteria are eligible for the migration:
• Uses the UCD Campus Zoom license
• Has an assigned UCD campus phone number
• Works 100% remotely or Hybrid OR Works on campus and would like to use a “soft phone” instead of a physical phone.
• Employees who meet the criteria above but would like to keep their landline are not required to migrate to the Zoom Phone.
• At this time, only individual users will be switched to the Zoom softphone. Specialized, departmental, and common area lines will continue using Cisco.
**What happens to user’s phone number and Cisco phone?**
Users will keep their same phone number when they are migrated to the Zoom phone. Once your Zoom Phone is enabled calls made to your university phone number will ring on your Zoom Phone.
Cisco hard phone devices that you have will no longer work and existing voicemail messages will be deleted. Voicemails will remain on Cisco’s Unity system for 30 days and then they will be deleted.
The Cisco phone will remain “active” meaning that if your computer is connected to your phone you will not lose internet service, but you will no longer see your directory number on the phone.
Please leave your Cisco hard phone where it is currently located (e.g. on your desk) and plugged in. Information and Educational Technology (IET) will work with your department on a phone recovery plan. Do not unplug your phone until you are either advised to do so by your departmental IT or supervisor, or someone comes to pick it up.
**Does the Zoom Phone work without an internet connection?**
Zoom Phone utilizes Voice over Internet Protocol (VoIP) technology. When making calls from the desktop application on your computer or tablet, it will utilize an internet connection to make or answer a call. If the internet is not working, you will not be able to make calls over the internet.
If you have the Zoom app downloaded to your phone, you will have the option to Switch to Carrier and utilize cellular data to complete a call, but standard rates will apply.
**Will a Zoom Phone call interrupt a Zoom meeting?**
Yes, unless you change your call handling settings, including sending callers to voicemail or enabling call waiting when you’re in a video meeting or on another voice call. You can make adjustments in the desktop app or web portal.
# Zoom Phone How To Links
**How to make a Zoom Phone Call**
[https://servicehub.ucdavis.edu/servicehub?id=ucd\_kb\_article&sys\_id=b178748f1bb402944690ea04604bcb73](https://servicehub.ucdavis.edu/servicehub?id=ucd_kb_article&sys_id=b178748f1bb402944690ea04604bcb73)
**How to manage Zoom Audio settings**
[https://servicehub.ucdavis.edu/servicehub?id=ucd\_kb\_article&sys\_id=14483c4b1bb402944690ea04604bcb19](https://servicehub.ucdavis.edu/servicehub?id=ucd_kb_article&sys_id=14483c4b1bb402944690ea04604bcb19)
**How to manage Zoom Phone Voicemail settings**
[https://servicehub.ucdavis.edu/servicehub?id=ucd\_kb\_article&sys\_id=5f97f8cb1b7402944690ea04604bcb5a](https://servicehub.ucdavis.edu/servicehub?id=ucd_kb_article&sys_id=5f97f8cb1b7402944690ea04604bcb5a)
**Choose settings on what action to take when a Zoom Phone call occurs during a Zoom Meeting**
[https://servicehub.ucdavis.edu/servicehub?id=ucd\_kb\_article&sysparm\_article=KB0010088](https://servicehub.ucdavis.edu/servicehub?id=ucd_kb_article&sysparm_article=KB0010088)
**How to switch a Zoom Phone call to a Zoom Video Meeting**
[https://servicehub.ucdavis.edu/servicehub?id=ucd\_kb\_article&sysparm\_article=KB0010091](https://servicehub.ucdavis.edu/servicehub?id=ucd_kb_article&sysparm_article=KB0010091)
**Transfer call to another user**
[https://servicehub.ucdavis.edu/servicehub?id=ucd\_kb\_article&sysparm\_article=KB0010093](https://servicehub.ucdavis.edu/servicehub?id=ucd_kb_article&sysparm_article=KB0010093)
**Make/receive Zoom calls through personal phone without revealing personal phone number**
[https://kb.ucdavis.edu/?id=10087](https://kb.ucdavis.edu/?id=10087)
**How to Add Contacts in the Zoom Desktop App**
[https://servicehub.ucdavis.edu/servicehub?id=ucd\_kb\_article&sys\_id=4956b59b1b3c0a944690ea04604bcbe7](https://servicehub.ucdavis.edu/servicehub?id=ucd_kb_article&sys_id=4956b59b1b3c0a944690ea04604bcbe7)
**How to set your emergency address**
[https://servicehub.ucdavis.edu/servicehub?id=ucd\_kb\_article&sys\_id=5843f8cb1b7002944690ea04604bcb2a](https://servicehub.ucdavis.edu/servicehub?id=ucd_kb_article&sys_id=5843f8cb1b7002944690ea04604bcb2a)
**How to Configure Zoom Phone Emergency 911 Settings**
[https://servicehub.ucdavis.edu/servicehub?id=ucd\_kb\_article&sys\_id=b206adad1b528a100e0b2068b04bcbc7](https://servicehub.ucdavis.edu/servicehub?id=ucd_kb_article&sys_id=b206adad1b528a100e0b2068b04bcbc7)
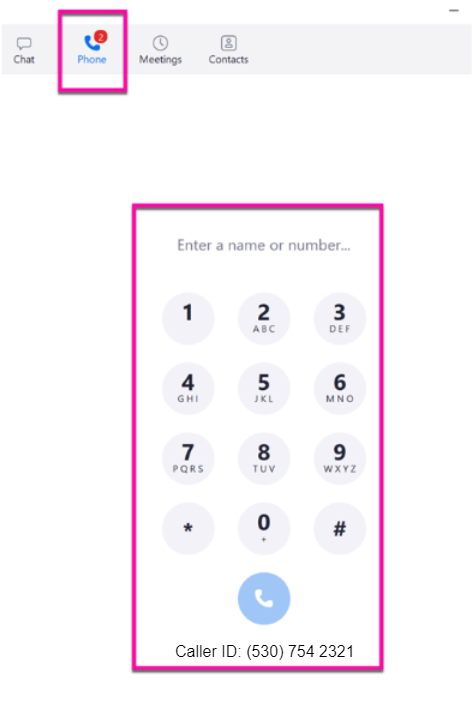
# How to Make a Zoom Phone Call
## How to make a Zoom Phone Call
1. In the Zoom Application, click on the **Phone** icon located in the top menu.
2. Enter a **Name** or **Phone number** manually or by clicking on the **Keyboard Number Pad**.
3. Click on the blue **Phone** icon to make the call.
# How to Manage Zoom Audio Settings
## Select or Change Audio Devices
1. In the Zoom application, click your **User Profile** icon located at the top right of the screen.
2. From the dropdown menu, select **Settings**.

3. In the menu on the left, click the **Audio** tab.
4. Under the Speaker section, click the dropdown arrow and select a speaker **Audio Device** (e.g., Speakers or Headphones).
5. Under the Microphone section, click the dropdown arrow and select a microphone **Audio Device** (e.g., Microphone).

## Troubleshooting Audio During a Call
1. If you experience audio issues during a call using the Zoom Desktop Application, click the **Audio** icon.
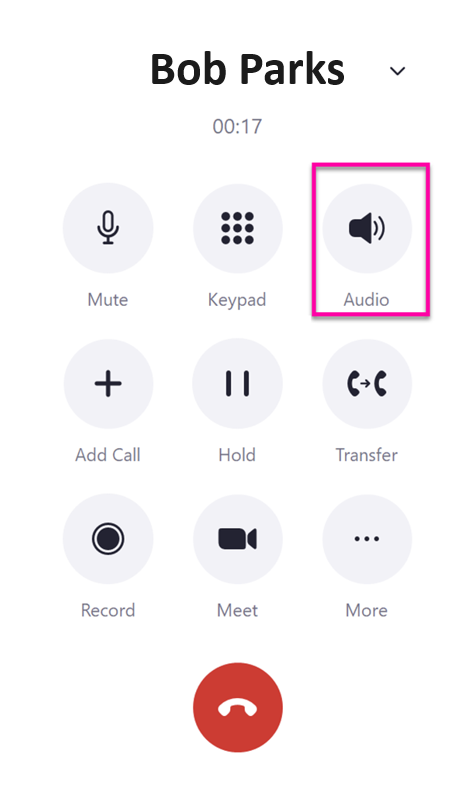
2. The Settings screen will display.
3. Under the Speaker section, click the dropdown arrow and select a speaker **Audio Device** (e.g., Speakers or Headphones).
4. Under the Microphone section, click the dropdown arrow and select a microphone **Audio Device** (e.g., Microphone).
Note: On some Microsoft PC Laptops that use docking stations, your monitor (e.g., Dell Monitor display) might display as an audio device. Be sure to select a speaker or microphone device instead to receive audio.

# How to Manage Zoom Voicemail Settings
## Record a Voicemail Greeting
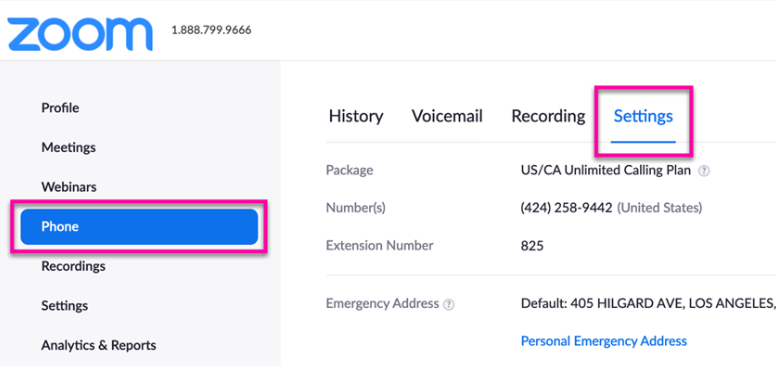
1. Navigate to zoom web portal via the link - [https://ucdavis.zoom.us/profile](https://ucdavis.zoom.us/profile)
2. In the left menu, click on **Phone**, then click on the **Settings** tab.

3. Scroll down to the **Call Handling** section.
4. Under **Greeting & Leave voicemail instructions**, click on the **Edit** link.
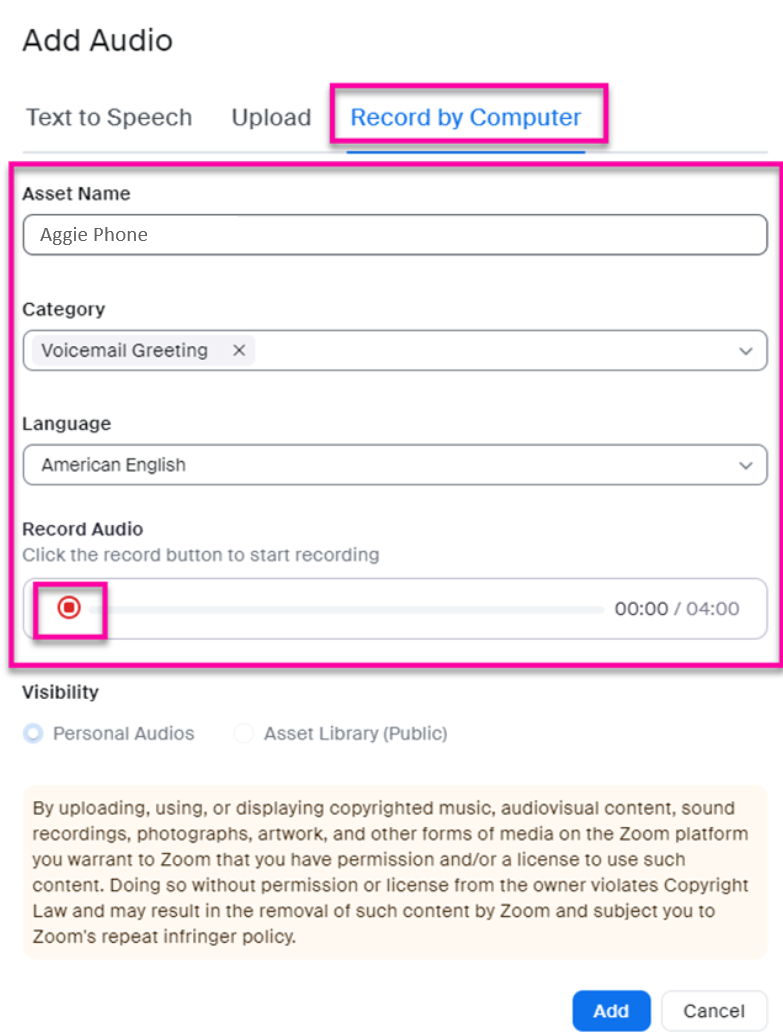
5. From the drop-down menu, select **Add Audio**.

6. Click the **Record by Computer** tab.
7. You will then be prompted to enter or select an **Asset Name** (e.g., Joe Bruin's Voicemail), **Category** (e.g., Voicemail Greeting), and **Language** (e.g., American English).
8. Under the Record Audio section, click on the **Record** button to begin recording your voicemail.
9. To stop the recording click the **Stop** button.
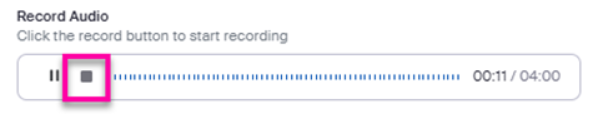
10. To listen to the recording, click the **Play** button.
11. To re-record a voicemail, click the **Record Again** link.

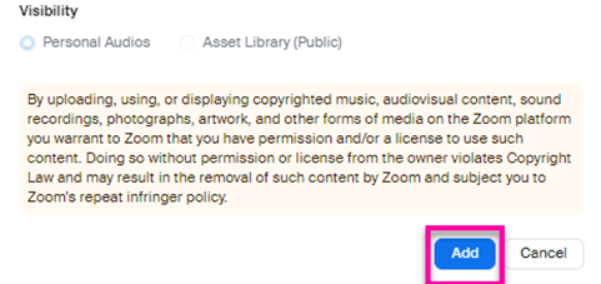
12. Once you are satisfied with your recording, click the **Add** button to save your voicemail recording.
## Add a Voicemail Using Text to Speech
1. Click the **Phone** link located in the left menu.
2. Click the **Settings** tab.
3. Scroll down to the **Call Handling** section.
4. Under **Greeting & Leave Voicemail Instruction**, click on the **Edit** link.
5. From the drop-down menu, select **Add Audio**.

6. Click the **Text to Speech** tab.
7. You will then be prompted to enter or select an **Asset Name** (e.g., Bob Park's Voicemail), **Category** (e.g., Voicemail Greeting), **Language** (e.g., American English), and **Voice** (e.g., Kevin-Male).
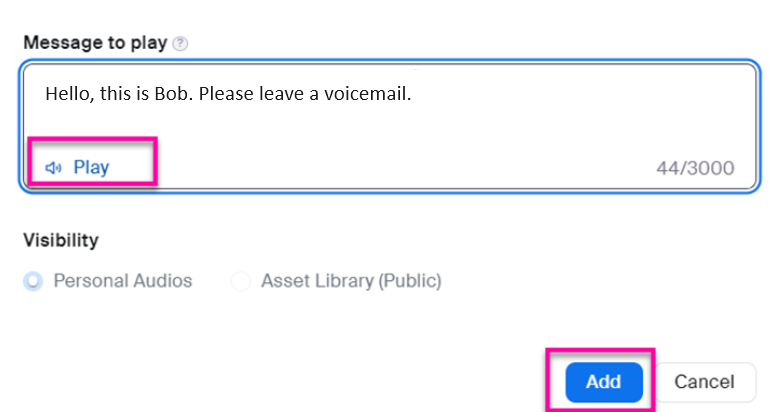
8. In the **Message to Play** text box, type in the desired message for your voicemail greeting (e.g., “Hi this is Bob Park, please leave a message”).
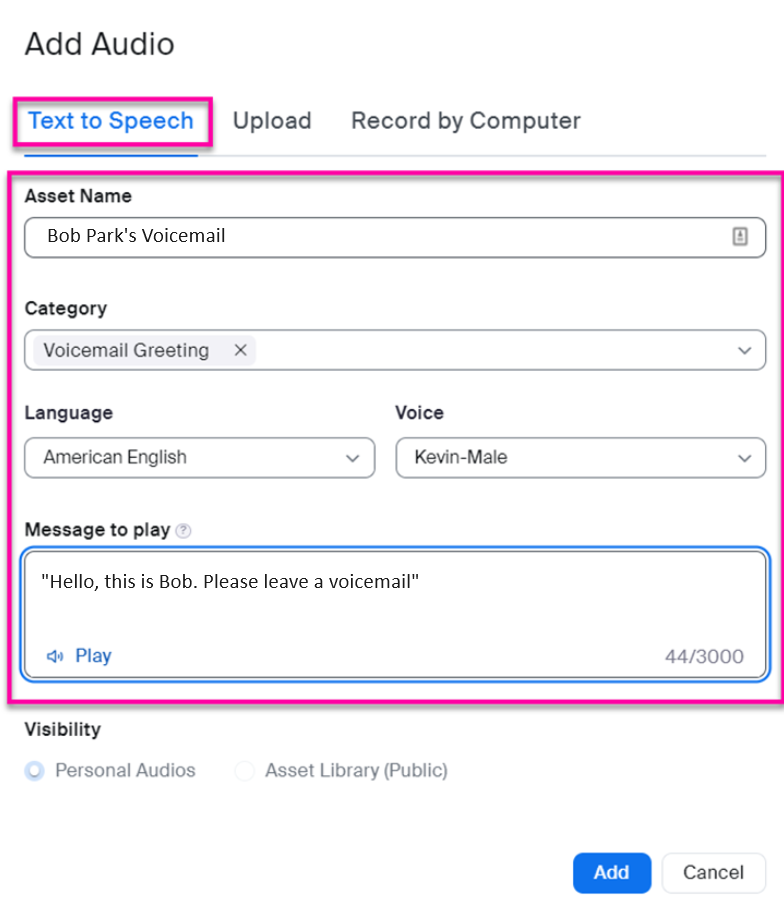
9. To preview your voicemail message, click the **Play** link in the lower left of the **Message to Play** section.
10. When you are satisfied with your recording, click the **Add** button to save your recording to the system.
## Upload Voicemail Audio
1. Click the **Phone** link located in the left menu.
2. Click the **Settings** tab.

3. Scroll down to the **Call Handling** section.
4. Under **Greeting & Leave Voicemail Instruction**, click on the **Edit** link.
5. From the drop-down menu, select **Add Audio**.

6. Select the **Upload** tab.
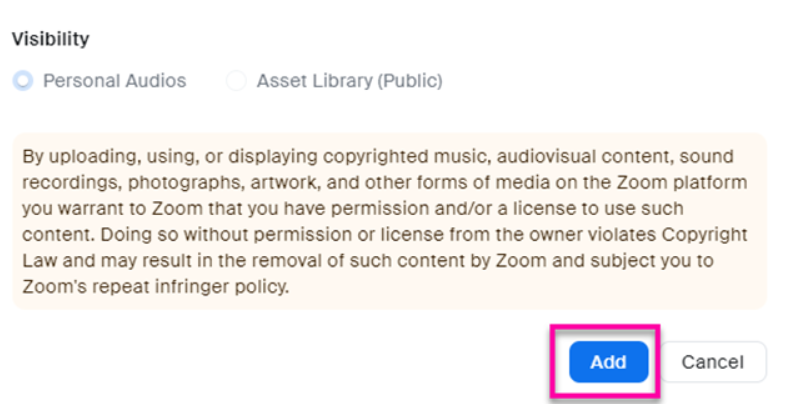
7. You will then be prompted to enter or select an **Asset Name** (e.g., Bob Park's Voicemail), **Category** (e.g., Voicemail Greeting), and **Language** (e.g., American English).
8. Click the **Upload** button to search for the .mp3 or .wav file that you would like to upload from your computer. Note: Each file must be **less than 10 MB**.
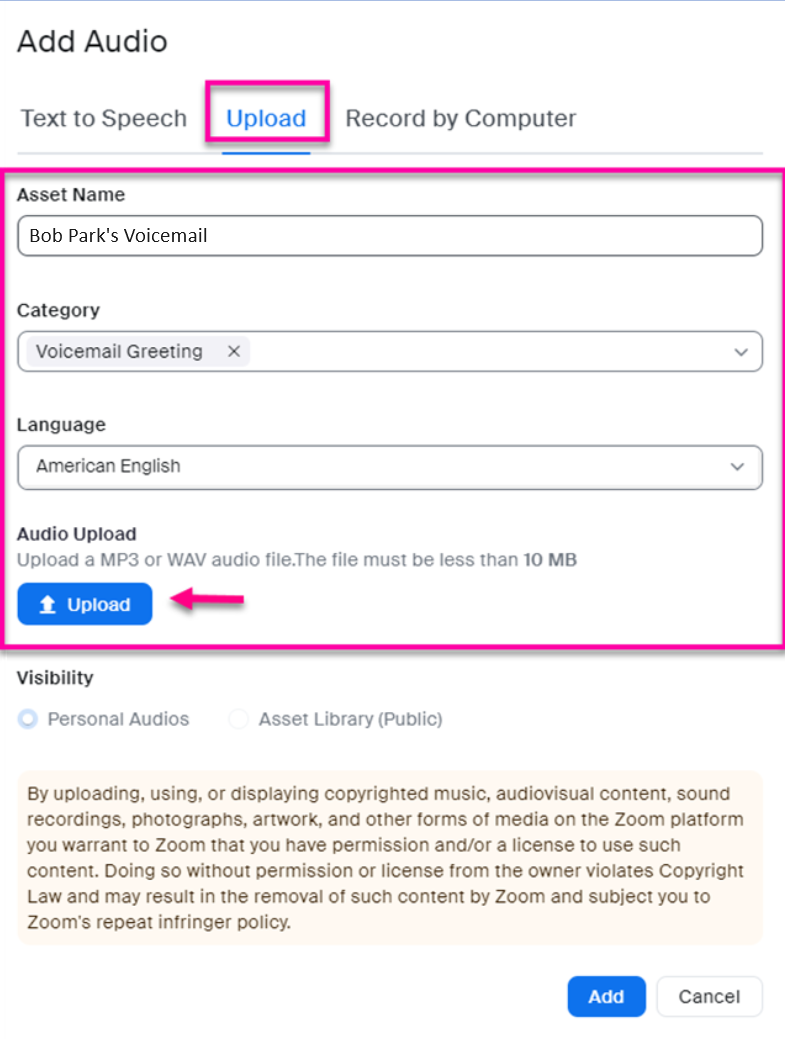
9. Click the **Add** button to save your audio to the system.
## Manage Voicemail
1. Click the **Phone** link located in the left menu.
2. Click the **Voicemail** tab.
3. All voicemails received will be displayed.
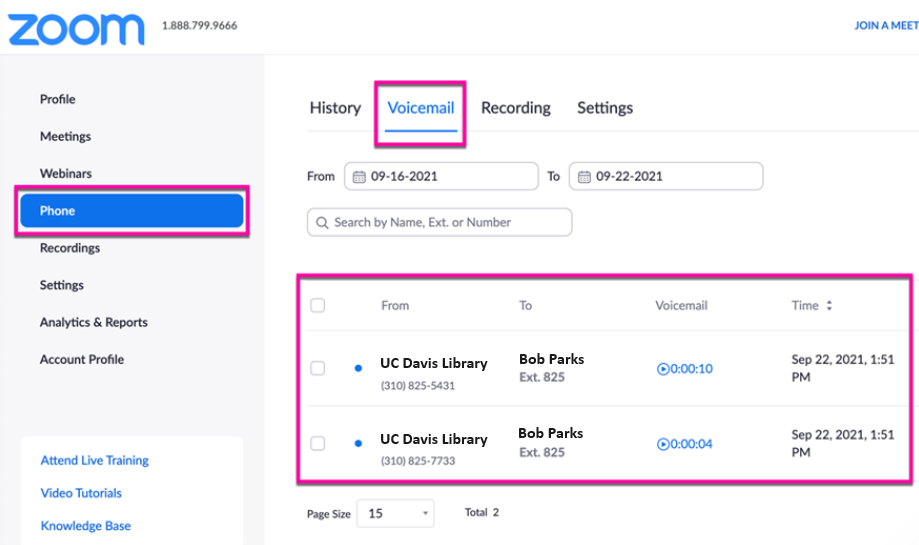
4. There are several ways to filter your voicemails:
- Enter a **From** and **To** date
- Search by **Name, Ext.** or **Number**
- Click the **Status (All)** dropdown menu to filter by **Status (All), Unread Read** or **Follow Up**.
- Click the **Type (All)** dropdown menu to filter by **Type (All)**, **Normal**, **Spam**, or **Maybe Spam** 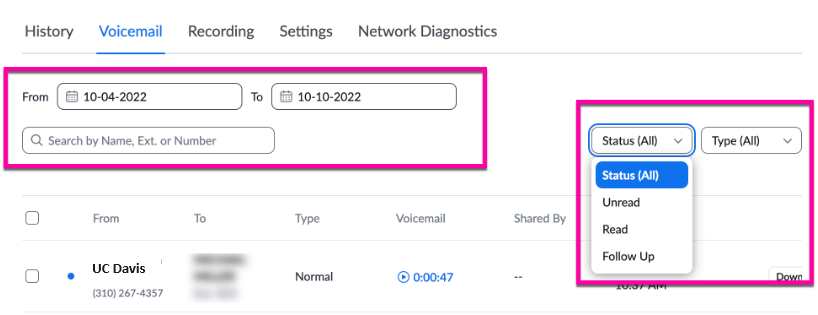
5. Click the **Play** button in the voicemail column to listen to a voicemail.
6. Click the **Download** button to export a voicemail to your computer.
7. Click the **3 Dots** icon to delete a voicemail (Note: if you do not see it, expand your window).

8. Alternatively, to Delete a voicemail, select the desired voicemail entry and click the **Delete** link.
9. Or, to block an phone number, select the desired voicemail entry and click the **Block** link.

# Manage Zoom Phone Call Handling Settings
1. Navigate to zoom web portal via the link - [https://ucdavis.zoom.us/profile](https://ucdavis.zoom.us/profile)
2. In the left menu, click on **Phone**, then click on the **Settings** tab.

3. Scroll down to the **Call Handling** section and adjust the settings as desired:
- **Business Hours** - Define your work hours when you want to be able to receive calls. Leave set to the default "24 hours a day, 7 days a week" if you want to always get calls.
- **Call Handling** - Choose which Zoom apps (desktop and/or mobile) on which you want to receive calls during your defined business hours. **Careful** - Turning them all of means your Zoom Phone will not ring.
- **Call Handling Ring Mode** - Simultaneous (all Zoom apps where you are logged in ring at the same time) or Sequential (one after the other)
- **Max Wait Time** - How long to wait before the **When a Call is Not Answered** action (below) is triggered.
- **When I'm Busy on Another Call** - Options for additional inbound calls, including using call waiting, sending to voicemail, forwarding to another number, etc.
- **When a Call is Not Answered** - Action for calls you do not pick up. Options include sending to voicemail, disconnecting, or forwarding.
- **Allow Callers to Reach an Operator** - Optional. Check and select an operator type (e.g. user) and then search by name or extension number.
- **Greeting & Leave voicemail instruction** to set up a greeting.
- **Holiday List & Call Handling** - To add or change holidays where you want to configure different call handling, such as sending calls to voicemail.

# How to switch a Zoom Phone call to a Zoom Video Meeting
## How to start a Zoom Phone call while in a Zoom Meeting
1. While in a Zoom meeting, navigate to the home screen of the Zoom client or app:
- **Desktop client**: Open the main Zoom window.
- **Mobile app (Android)**: Tap the back button at the bottom-left corner of the screen.
- **Mobile app (iOS)**: Tap **More** then **Minimize Meeting**.
2. Make or receive a Zoom Phone call. If receiving a Zoom Phone call, click/tap **Hold Meeting Audio & Accept** in the call notification. If you haven't joined meeting audio, click/tap **Accept**.
3. Zoom will display a message to confirm the switch. Click/tap **Continue**.
**Note:** Zoom will continue to display your meeting video to participants.
4. See the next section if you want to switch back to the meeting.
### Switch audio from a Zoom Phone call to a Zoom Meeting
1. While in a Zoom Phone call, navigate to the in-meeting controls:
- **Desktop client**: Click the **Home** tab, then click **Back to Meeting**.
- **Mobile app**: Tap the **In meeting** floating notification icon:

2. Click/tap **Join Audio** in the meeting controls:

3. The Zoom Phone call will be placed on hold.
## How to start a Zoom Meeting while in a Zoom Phone call
1. While in a Zoom Phone call, go back to the home screen of the Zoom client or app:
- **Desktop client**: Click the **Home** tab.
- **Mobile app (Android)**: Tap the back button at the bottom-left corner of the screen.
- **Mobile app (iOS)**: Tap **More** then **Minimize Meeting**.
2. Join or start a Zoom meeting.
3. Click/tap **Continue**.
4. See the next section if you want to switch back to the Zoom meeting.
### Switch audio from a Zoom Meeting to a Zoom Phone call
1. While in a Zoom meeting, navigate to the in-call controls:
- **Desktop**: Open the main Zoom window and click the **Phone** tab.
- **Mobile**: Tap the **On Hold** floating notification icon:

2. Click/tap **Unhold** using the in-call controls:

**Note:** Zoom will continue to display your video to participants in the meeting.
## How to merge a Zoom Phone call in to a Zoom Meeting
1. Follow one of the sections above to start a Zoom Phone call or Zoom meeting.
2. Make sure that the Zoom Phone audio is active. If the audio is not active, switch audio from meeting to Zoom Phone.
3. Click/tap **Meet** using the in-call controls.
4. Click/tap **Merge**. Zoom will add the call participant to the Zoom meeting. If you have waiting room enabled for the meeting, the call participant will be added to the waiting room for you to admit.
# How to Transfer a Zoom Phone Call to Another User
## Transfer a Call
1. Accept the **Incoming Call**.
2. Click the **Transfer** icon:

3. The caller will automatically be placed on **Hold**.
4. Enter a **Name** or **Phone Number** to transfer the caller to.

5. Click the **Transfer** icon to transfer the caller.

6. Select the desired **Transfer** option:

# How to Add Contacts in the Zoom Desktop App
## **How to Add Contacts in the Zoom Desktop Application**
1. Sign into the Zoom Desktop Application using your **UC Davis Login ID** and **Password**.
2. From the top menu, click on the **Contacts** tab.

3. In the top-left corner of the contacts menu, click the **Add (+)** icon and select **Invite a Zoom Contact**.

4. You will then be prompted to enter the **Contact's Email Address** you want to add. Once you enter the email, click on **Invite**.
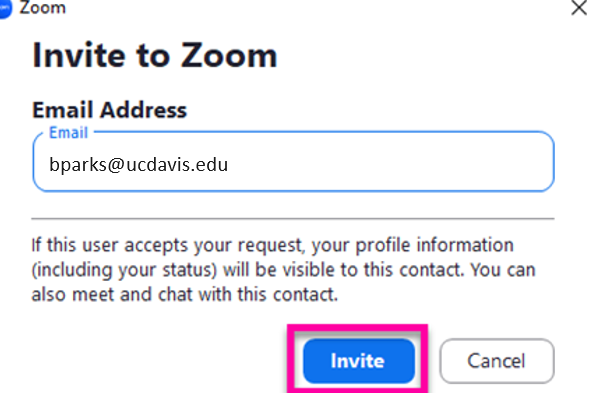
5. A pop-up message will either state that the **Individual is Already Your Contact** or that **An Invitation Has Been Sent to Them.** Depending on the pop-up message, click **Start Chat** or **OK.**
6. Repeat the steps for any additional contacts.
## How to Add Contacts in the Mobile Application
1. Sign into the Zoom Mobile Application using your **UC Davis Login ID** and **Password**.
2. From the bottom menu, click on the **Contacts** tab.

3. In the top-right corner, click the **Add (+)** icon and select **Invite a Zoom Contact**.

4. You will then be prompted to enter the **Contact's Email Address** you want to add. Once you enter the email, click on **Add**.

5. A pop-up message will either state that the **Individual is Already Your Contact** or that **An Invitation Has Been Sent to Them.** Depending on the pop-up message, click **Open Chat** or **OK.** 
6. Repeat the steps for any additional contacts.
# How to Set Your Default Emergency Address
1. Login to Zoom application.
2. Navigate to Phone tab of the application by clicking the **Phone** icon.

3. Click on the **red arrow** on the right then click on **Wrong Update it. (Note:** If the **arrow color is grey** , you need to enable location services first in the system settings).

4. You will be prompted to Update Emergency Address. Click on **Add a New Emergency Address**.

5. **\*\*IMPORTANT\*\*** Please enter the physical address you are located now with following information:
- **Country/Region**
- **Street Address** (Address Line 1 and Address Line 2)
- **State/Province/Territory**
- **City**
- **Zip/Postal Code**
6. Select the first radio button. You may select the second radio button if you want this to be your default address (in case other addresses are not detected). Click on **Save**.

7. You will receive confirmation as “Emergency Address Updated” (pop up on the right of window).

8. In the above step if you **did not select the second radio button** while saving, follow to next steps.
9. Navigate to the UCD Zoom web portal at [https://ucdavis.zoom.us/profile](https://ucdavis.zoom.us/profile).
10. Under the Phone menu, click on the **Settings** tab and click on **Edit** link.

11. Here you are setting your office address only (not home office), start typing street number in the empty box and select your office address and click Save.
NotE: If you primarily work from home, you can set your home address as default address by selecting **Choose a personal address** radio button.
12. You successfully completed setting up your emergency location address
**Note:**
- If you move to a new location, you will see a red arrow , you need to follow step 3 to 5 again (Please note here you may not get “Wrong , update it” prompt but you will see add emergency address)
- If you roam across previously entered addresses, you will not be prompted to add/update emergency address.
- **Mac users must enable network detection**: In order for Mac clients to detect a network change event when connected to your wired network, your organization will need to deploy the Location Helper supplementary package. The Location Helper allows Mac clients to report the network switch's MAC address, port number, and port label which enables Zoom to detect user location for emergency services. This installation requires local administrator privileges. Download the Location Helper: [https://ucdavis.zoom.us/client/latest/Location.pkg](https://ucdavis.zoom.us/client/latest/Location.pkg)
- **Windows users have automatic location sharing**: Zoom users on Windows will share locations for nomadic emergency services and other location-based calling restriction calling purposes. Windows users will get an in-app notification.
# How to Configure Zoom Emergency 911 Settings
After campus users are transitioned to Zoom Phone service, they can dial 911 from their Zoom Phone Mobile App, Desktop App, or desk phone (when available). For 911 responders to identify an accurate user location when 911 is dialed, campus users should enable Location Permissions on the devices on which they use Zoom Phone.
**NOTE: Using your cell phone is typically the best option to dial 911.**
### **What happens when dialing 911 from Zoom Phone?**
- **Zoom Mobile App -** When you dial 911 from the Zoom Phone App on your cell phone, it will always use your native cell phone service to dial 911. This means the best information available is always used.
- **Zoom Desktop App** - When you dial 911 from the Zoom Desktop App, Zoom will use the Emergency Address you previously supplied; it will have more accurate data if Location Permissions have been granted. Therefore, it is recommended that you “enable” Location Permissions for Zoom Phone.
### **Getting Started with Zoom Phone 911 Locations**
1. **[Enable Location Services](https://kb.ucdavis.edu/?id=10401) (One Time Setup, applies to Mac, Linux, and tablets):** For Zoom to report more specific 911 information, location services must be turned on. During a 911 call, devices capable of geo-locating will be able to report your geo-coordinates to emergency services, **but only if Location Services are Enabled on your device**. Enabling location services are also required to set up Personal Addresses as described below KB article.
- Zoom for Windows is automatically configured with Location Services turned on.
- Using the Zoom application on cellular devices does not require location services because 911 calls are sent via cellular.
- **Location Permission does not allow any tracking except your location for a 911 call**
2. **[Set Your Default Location](https://kb.ucdavis.edu/?id=10402) (One Time Setup) -** When dialing 911, if no other address information is available, the system will report our system default location (1 Shields Ave., Davis) to emergency services. For this reason, it is important to set your default location to the address from which you predominantly work.
3. **[Update Personal Addresses](https://kb.ucdavis.edu/?id=10403) (Ongoing) -** When you start using Zoom Phone from an initial or new location, the Zoom application will prompt you to confirm your location. Zoom will try to be helpful and ask you if you are currently at your default location by prompting via an icon on Zoom Phone application (Please refer to the below screenshot). If you are not, you will need to add a new location. Making the selection will start to build a personal database of locations where you work. These configured locations will be remembered when you return to the same location in the future. Zoom should not prompt you again for the same location, so getting it correct the first time is important. Please refer to the below KB article on how to update personal address on Zoom Phone.

**Note**:
- If you have not enabled Location Services on your Zoom device, you will not be able to set your location to a Personal Address.
- If the Zoom application suggests that you are at “1 Shields Ave, Davis” that is an indicator that your default location has not been properly set. Please go to the “Set Your Default Location” section above.
### **What if my 911 Address is Incorrect?**
If your 911 address is ever incorrect, the system will prompt you to update that address by displaying a red arrow and dot on the upper right of your Zoom Phone tab. Please click on that red arrow and dot to update your address. If the address is incorrect and you are NOT seeing the icon, you may need to open a ticket with IT Express to have your locations reset. Please see article [Checking Your Zoom Phone 911 Location Setting](https://kb.ucdavis.edu/?id=10404) for more information.
**NOTE:** “1 Shields Ave, Davis” is not a valid dispatchable address for emergency services. Pleas set you default address to your most frequented work location.