File Shares
- How do I disconnect & reconnect PHS file shares?
- How do I unlock a file that is locked for editing?
- How do I map PHS file shares?
- How do I map UCDH file shares?
- I am missing folders in the file share. How do I make them show up?
- Accessing PHS file shares while connected to the UCDH VPN
How do I disconnect & reconnect PHS file shares?
In this example we will be remapping the phs-admin share. The steps work for the other shares as well, you just need to get the right URL. You can find the URL for each of the PHS drives in Mapping PHS Shares.
Procedure
- Open File Explorer, and click "This PC"
- If "phs-admin" appears right click on the phs-admin icon and click Disconnect
- In the upper left corner of the This PC window click the "Computer" tab and then click the Map network drive icon.
- Select the drive letter (M:) and enter this path:
\\admin-fs.phs.ucdavis.edu\phs-admin - A prompt to enter username and password will appear. Enter your PHS user name and password, but enter your user name as
epm\[username] - Check the boxes "Remember my credentials" and “Connect using different credentials”.
- Click Finish
How do I unlock a file that is locked for editing?
Overview
I met a problem. I was trying to open an Excel file but got a message saying my file is locked for editing by another user. Why did I get this error? After researching many solutions online, I am stumped and hope someone can help figure this out.

As a frequent user of Excel application, you are bound to face errors like this. You do not have to be panic if you incur such an editing error as it is common with Excel files and it can be fixed.
Keep reading this article as it explains why the excel file is locked for editing and shows how to fix this error. Additionally, you can learn how to avoid this error next time.
Part 1: Why is the Excel File Locked for Editing?
It will be easy to handle this problem if you know the causes for Excel file being locked for editing. There are lots of causes can trigger this type of error:
-
File in use or locked for editing error occurs when Excel fails to close properly, therefore, failing to save the file accordingly.
-
The file could be opened by another user when open in a shared network. In this case, you can only open in Read-Only mode and receive a notification when the file is ready for editing.
-
Sometimes, Microsoft Office may create a temporary file for your Excel, which has "~$" followed by the name of your Excel file. This will also trigger the error "filename.xlsx is locked for editing by "username"".
Part 2: How to Fix Excel File is Locked for Editing
This error can be easily solved. Before proceeding to the guide below ensure the Excel file is closed on all devices. In case the error persists, close the file for a while and reopen it to releases the lock on the file. Alternatively, you can ask for edit permissions on the file or wait for the file to be closed by the other user.
If you are not successful then here is a simple guide to accessing an excel file locked for editing.
Step 1: Keenly note the file name and the file path. To begin, launch the "Run" dialogue box by simultaneously holding the "Windows" key and pressing "R".
Step 2: Search for the Microsoft Management Console by inputting "MMC" on the search bar and choose "File" and then "Add/Remove Snap-in".

Step 3: Select "Shared Folders" in the list of "Available Snap-ins" and click "Add" to add it to the "Selected snap-ins" list.

Step 4: On the "Select the computer you want the snap-in to manage" prompt, select the "Local computer" option if you are logged in on the server or "Another computer" if you are logged in at a different computer. Search for the file location from this window.

Step 5: Proceed to select "Open Files" and click "OK".
Step 6: Finally, expand the "Open Files" list, sort the list preferably by author/user name to locate the file. Right-click on the file and select "Close Open file" from the options.

Now you can edit the excel file having disconnected the user who had it open. Exit Excel and open the file afresh to edit.
Part 3: How to Avoid the Situation "Excel File Locked for Editing"
Having known how to fix the error, be sure of how to avoid it next time. Using these tips, you are free to work on your files across multiple users simultaneously.
Tip 1. Use Excel Version That Supports Co-authoring
Use the Excel version that supports co-authoring such as Excel for the web, Excel for Android, Excel for iOS, Excel for Office 356 and Excel for Office 365 for Mac.
However, the last two versions require you to sign in to an Office account with an Office 365 subscription. For best co-authoring experience, you are advised to all use Excel Online.
Tip 2. Upload the File to Cloud
Tip 3. Check the File Formats
You must consider file formats for co-authoring to be sure its compatible with all users. The recommended formats are .xlsx, .xlsm or .xlsb for Windows and Mac users.
-
To set the file format for Windows, click the File>Save As>Browse>Save as type and select the above formats.
-
For Mac users click the File, Save As options and select the .xlsx, .xlsm, or .xlsb formats as well.
Tip 4. Check One Drive Sync App
For One Drive sync app users, ensure it's the latest version for each user and not paused at any given time.
Tip 5. Get Rid of Unsupported Features
Finally, in case there is a feature not supported by co-authoring, there will be the "locked" error. Therefore, you will have to turn off the Shared Workbook feature and open the workbook instead of the snapshot from SharePoint.
Close_file_that_is_locked_for_editing.pdf
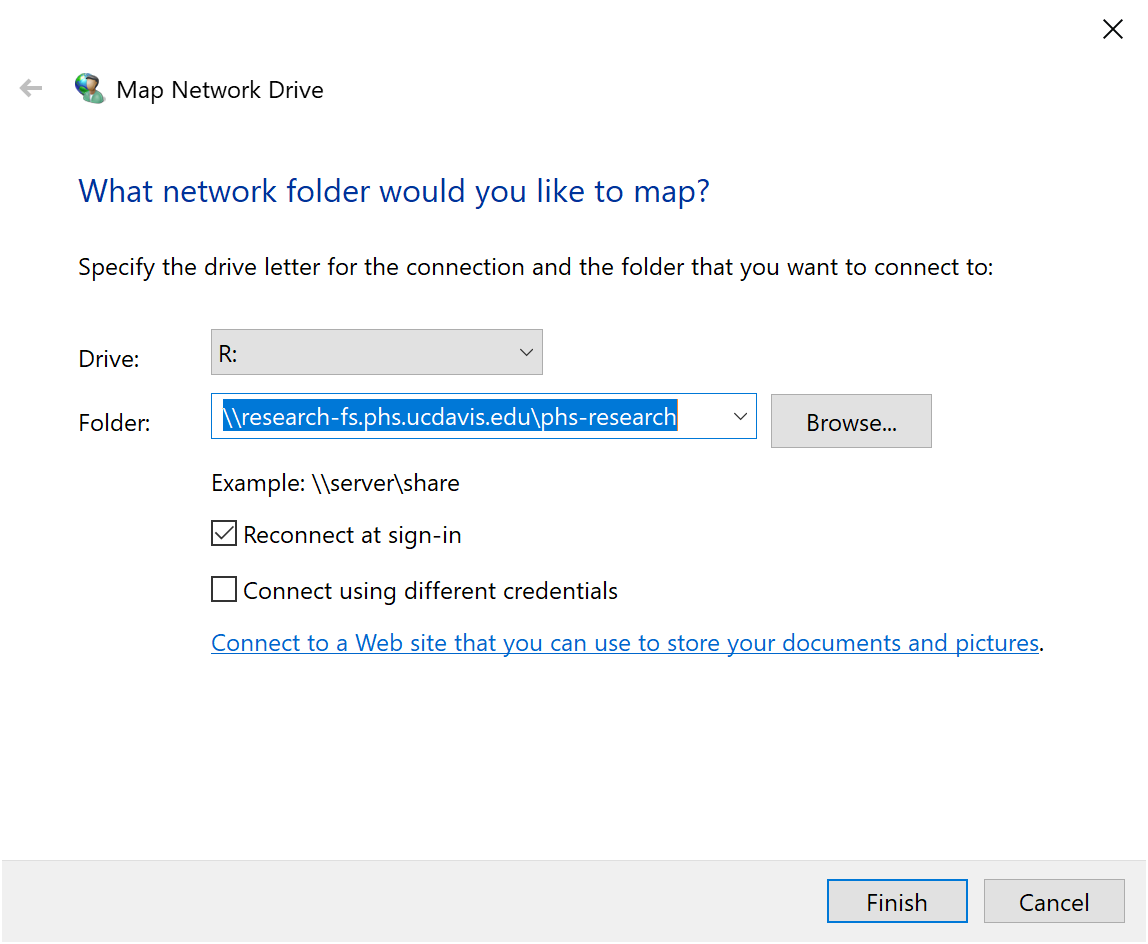
How do I map PHS file shares?
Procedure
- Type
map network driveinto the search field at the bottom left of the computer display and click the This PC icon when it appears. - In the upper left corner of the This PC window click the Computer link and then click the Map network drive icon.
- This will open the Map Network Drive Wizard.

- Select the Drive letter and enter the Folder path as shown in the above screenshot
- IHP folder (I: Drive): Select the drive letter (I:) and enter this path:
\\research-fs.phs.ucdavis.edu\ihp - Research folder (R: Drive): Select the drive letter (R:) and enter this path:
\\research-fs.phs.ucdavis.edu\phs-research - Admin folder (M: Drive): Select the drive letter (M:) and enter this path:
\\admin-fs.phs.ucdavis.edu\phs-admin
- IHP folder (I: Drive): Select the drive letter (I:) and enter this path:
- A prompt to enter username and password will appear. Enter your PHS user name and password
Note: You will need to enter your user name asepm\[username]. - Check the boxes "Remember my credentials" and “Connect using different credentials”.
- Click Finish
How do I map UCDH file shares?
Procedure
- Type
map network driveinto the search field at the bottom left of the computer display and click the This PC icon when it appears. - In the upper left corner of the This PC window click the Computer link and then click the Map network drive icon.
- This will open the Map Network Drive Wizard. Select the Drive letter and enter the Folder path
For H: Drive
- Select the drive letter (H:) and enter this path:
\\hsnfm01.ucdmc.ucdavis.edu\homefolders\[user folder]. - A prompt to enter username and password will appear. Enter your HS username and password, but enter your user name as
hs\[username]. - Be sure to check the box “Remember my credentials”.
- Click Finish
For S: Drive
- Select the drive letter (S:) and enter this path:
\\hshome.ucdmc.ucdavis.edu\shared\[foldername].- If you don’t remember the entire path just enter
\\hshome.ucdmc.ucdavis.edu\sharedand then after mapping the drive navigate to the folder you need to access.
- If you don’t remember the entire path just enter
- A prompt to enter username and password will appear. Enter your HS username and password, but enter your user name as
hs\[username]. - Be sure to check the box “Remember my credentials”.
- Click Finish
I am missing folders in the file share. How do I make them show up?
Requirements
- Sync Center must be disabled.
- Admin privileges are required.
Procedure
- Open the Control Panel (All Items view), and click on the Sync Center icon.
- In the left pane, click on the Manage offline files link.
- Click on the Disable offline files button.
- If prompted by UAC (User Account Control), then click on Yes.
- Click on OK.
- Click on Yes to restart the computer.
Accessing PHS file shares while connected to the UCDH VPN
Computers that are issued by PHS and configured for the EPM domain should have a script that connects the PHS file shares after the computer signs to the UCDH VPN client, Cisco Secure Client. If you have a PHS issued computer that is configured for the EPM domain and the drives are not reconnected, open Command Prompt and type the command below that corresponds to the drive you need to access.
To open Command Prompt, type "cmd" in the search bar in the lower left corner of your display and click the Command Prompt icon when it appears in the search results.
M Drive:
net use m: \\\admin-fs.phs.ucdavis.edu\phs-admin /user:%username%
R Drive:
net use r: \\\research-fs.phs.ucdavis.edu\phs-research /user:%username%
I Drive:
net use i: \\\research-fs.phs.ucdavis.edu\ihp /user:%username%
